 Save
Save The first time I constructed a donut tower, the kitchen was alive with bursts of laughter and the sweet aroma of yeasty glaze. No matter how many elaborate cakes I've baked, there's something almost mischievous about piling up donuts like edible building blocks and calling it dessert art. My hands were sticky with icing by the time the last golden mini was nudged into place, my counter sprinkled in a riot of rainbow colors. Looking at the towering, cheerful chaos, I thought: there is no dessert more perfectly suited to a celebration. This project manages to feel both playful and triumphant, which is exactly how graduation nights should be.
I remember setting this up for my cousin's graduation on a humid June evening, the house brimming with nervous soon-to-be college students and proud parents. We huddled around the living room coffee table, each person vying for donut placement and strategic sprinkle distribution. There was a mini tug-of-war over whose donut would crown the top of the tower, and the sound of laughter mingled with the clink of toothpicks and the gentle thunk of donuts sliding onto the cone. When the youngest cousin snuck in early for a taste test, there were zero complaints—only more giggles. By the end, it felt like the donut tower had presided over the party as much as the grad herself.
Ingredients
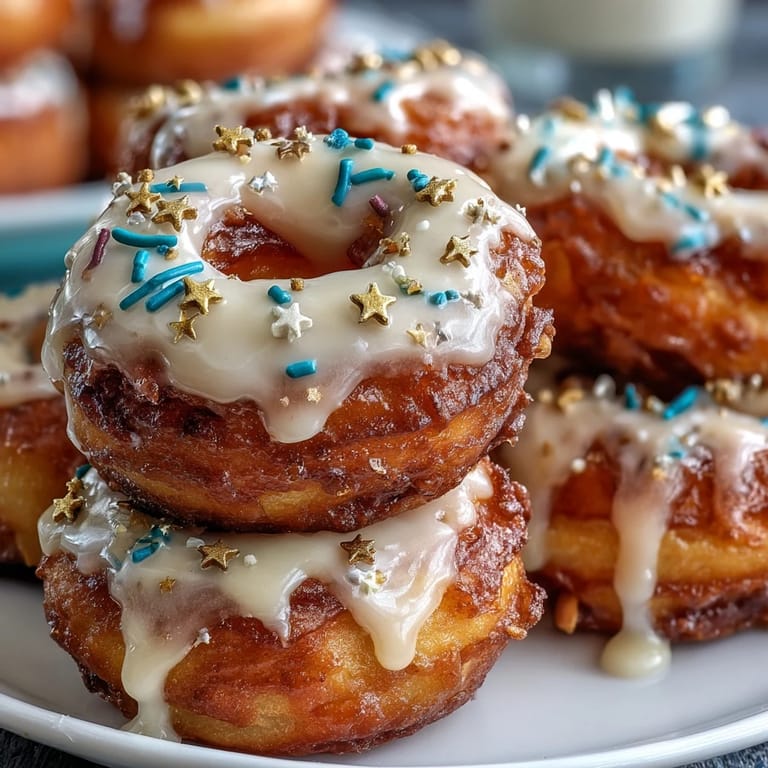
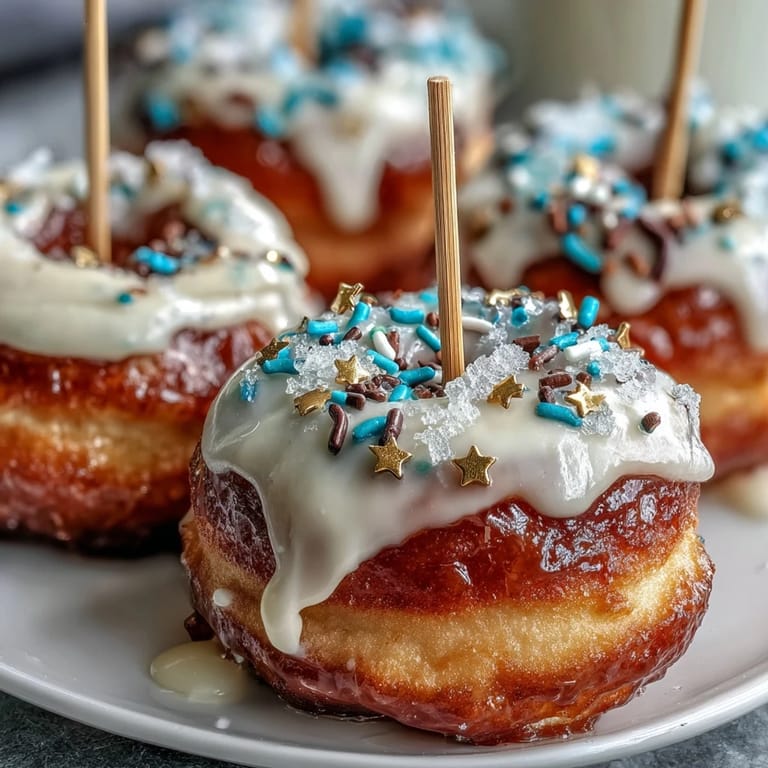
- Mini glazed donuts: Fast and festive, these are the foundation; they stack best when they're slightly firm and not overly sticky.
- Powdered sugar: Essential for homemade icing; sift it first to dodge pesky clumps in your glaze.
- Milk: Just a splash brings your icing to the right drizzle—add little by little so you don't overshoot.
- Vanilla extract: Adds that extra whiff of bakery magic; a real vanilla makes the difference.
- Colorful sprinkles: The soul of the party and the easiest way to match any school's colors or the grad's favorites.
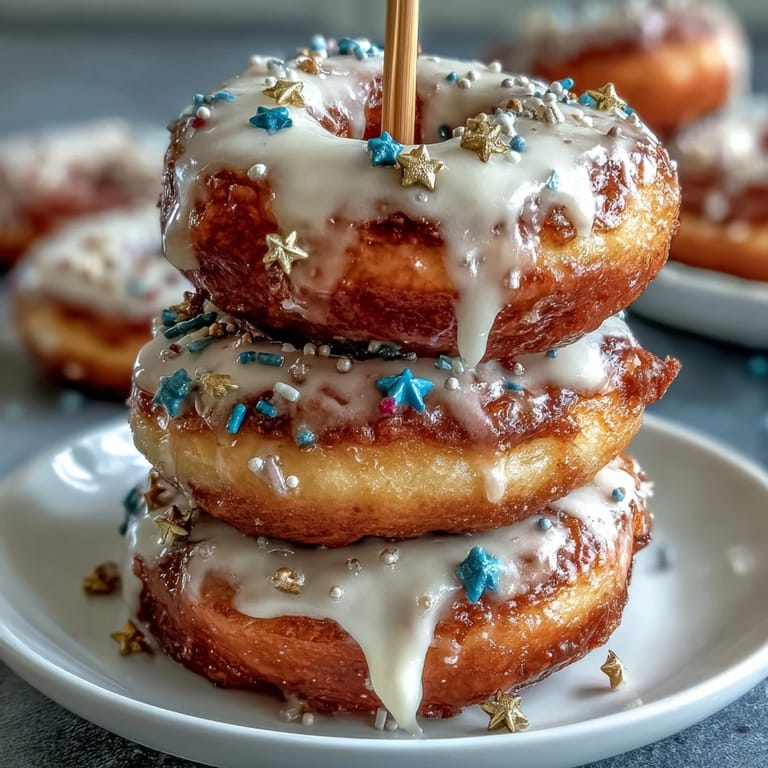
- Edible gold stars: If you're feeling fancy, these catch the light and elevate the whole display—totally optional, but crowd-pleasing.
- Graduation-themed toppers: Pop these on top for instant celebration vibes.
- Large styrofoam cone: Your not-so-secret structural base—cover in plastic wrap if you're worried about crumbs.
- Wooden skewers or toothpicks: Think of these as edible architecture supplies to hold every donut in place.
Tired of Takeout? 🥡
Get 10 meals you can make faster than delivery arrives. Seriously.
One email. No spam. Unsubscribe anytime.
Instructions
- Prep your donuts:
- If using homemade, make sure they’re completely cool before starting; if store-bought, fluff them gently so icing and decorations go on evenly.
- Mix the icing:
- Stir together powdered sugar, milk, and vanilla until the glaze clings to your spoon, glossy and thick—add milk drop by drop to reach the perfect consistency.
- Dip and sprinkle:
- Dance the donut tops through the icing, let the excess drip, then quickly shower each with sprinkles before the glaze sets; watch them transform with a simple swirl.
- Base layer build:
- Place your styrofoam cone on a sturdy platter, and secure your first ring of donuts at the bottom, gently pushing in skewers to anchor them in a snug circle.
- Stack and secure:
- Add donuts in overlapping layers, working upward and using toothpicks or skewers to keep each in place—turn the tower slowly as you go for even coverage.
- Fill and decorate:
- If you spot gaps, tuck in extra donuts or double up skewers; sprinkle more color and nestle edible stars wherever you like a flash of gold.
- Crowning glory:
- Nestle a graduation topper or sparkler right at the top and pause to admire your handiwork before the donut fans arrive.
- Serve and enjoy:
- Keep the tower covered at room temp for a couple of hours if needed, but don’t be surprised if it disappears as soon as you present it.
 Save
Save Watching everyone mingle around the donut tower, it hit me: the best party food isn't about culinary feats or fuss—it's about bringing people together to share in a little sweet chaos. That moment, between the cross-table giggles and enthusiastic ‘pick your own’ donut grabs, is when this tower became more than just dessert—it was the main attraction, the icebreaker, and the memory-maker.
Personalize Your Tower for Extra Fun
Switching up flavors or using a rainbow of glazes has become something of a tradition in our house. On more than one occasion, I’ve tucked a few filled donuts into hidden layers—always a crowd-pleasing surprise when someone bites in and discovers a custard or raspberry center. For graduation themes, we gravitate toward sprinkles matching school colors or edible glitter for an extra sparkle. It’s amazing how quickly each batch becomes a reflection of the guest of honor and the party mood.
Tips for a Sturdy and Impressive Display
Tower stability scared me at first, but after experimenting, I realized the best defense is a dense bottom ring and alternating the direction of skewers as you stack upward. Gently press each donut so it hugs the form, but don’t squish or break them—too much enthusiasm will undo your progress. Make sure the cone sits on a flat, non-slip surface before assembling; no one wants a donut-tower landslide! If you’re nervous, practice the first ring on the counter before assembling in front of an audience.
Celebrate with Style and Ease
No matter how simple your donut choices, piling them high turns them into a centerpiece worthy of celebration. The key is letting go of perfection—embrace the wonky angles and sprinkle spills, since that’s what gives the tower its charm. Before guests arrive, I always hide a few extra donuts behind the tower for inevitable snackers who can’t wait.
- Choose donuts that aren’t too sticky, or you’ll end up with collapsing layers.
- Let the icing set before assembly so fingers stay cleaner during the build.
- If you’re short on time, skip the homemade icing and use pre-glazed donuts with extra sprinkles for flair.
 Save
Save This donut tower is the carefree party trick I come back to again and again—fun to build, faster to serve, and impossible to forget. May your next celebration be as sweet, colorful, and gleeful as this dessert centerpiece.
Questions & Answers
- → How do I prevent donuts from slipping on the cone?
Trim a small flat spot on the inner edge of each donut if needed and insert wooden skewers through the center and into the styrofoam cone at a slight downward angle. Slight overlap between rows helps lock the donuts in place.
- → Will store-bought glazed donuts work as well as homemade?
Yes. Fresh store-bought glazed minis are ideal for speed and consistency. If using homemade donuts, ensure they are fully cooled so icing sets properly and the donuts hold their shape on the tower.
- → How long should I let the icing set before stacking?
Allow dipped donuts about 10–15 minutes for the icing to thicken and hold sprinkles. They should be tacky but not wet to avoid smudging adjacent donuts during assembly.
- → Can I mix different donut flavors or glazes?
Mixing flavors adds visual interest and variety—chocolate-glazed, vanilla, and filled minis work well. Alternate flavors or use contrasting glazes to create stripes or tiers on the tower.
- → How should I store the tower before serving?
Assemble no more than two hours ahead at room temperature and cover lightly to protect from dust. Avoid refrigeration to keep glazes and sprinkles from sweating and losing their shine.
- → Any tips for decorating gaps and finishing touches?
Use extra mini donuts to fill visible gaps, add a sprinkle dusting after assembly, and insert edible stars or themed toppers for sparkle. Serve with chocolate and caramel dipping sauces on the side.