 Save
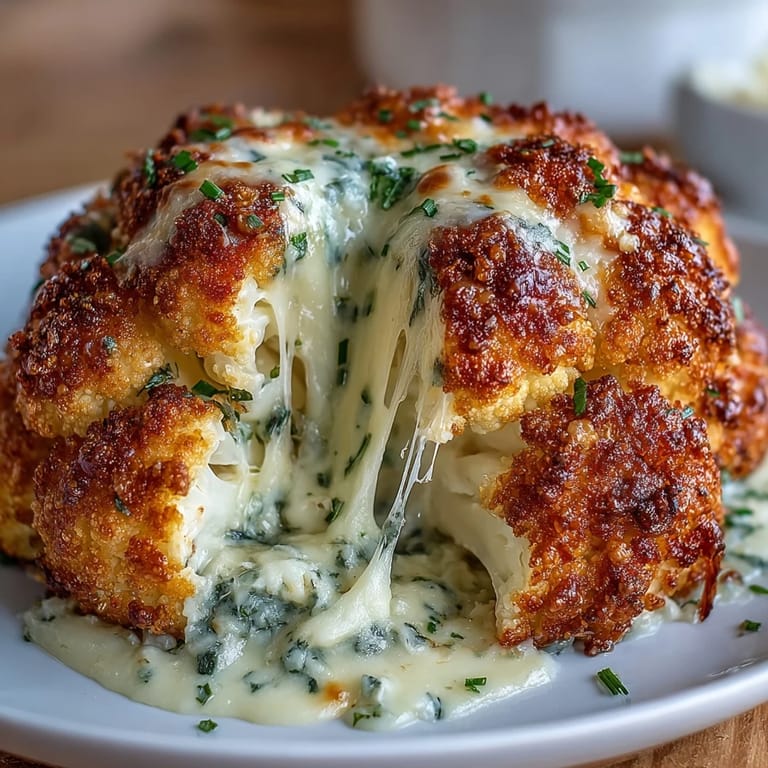
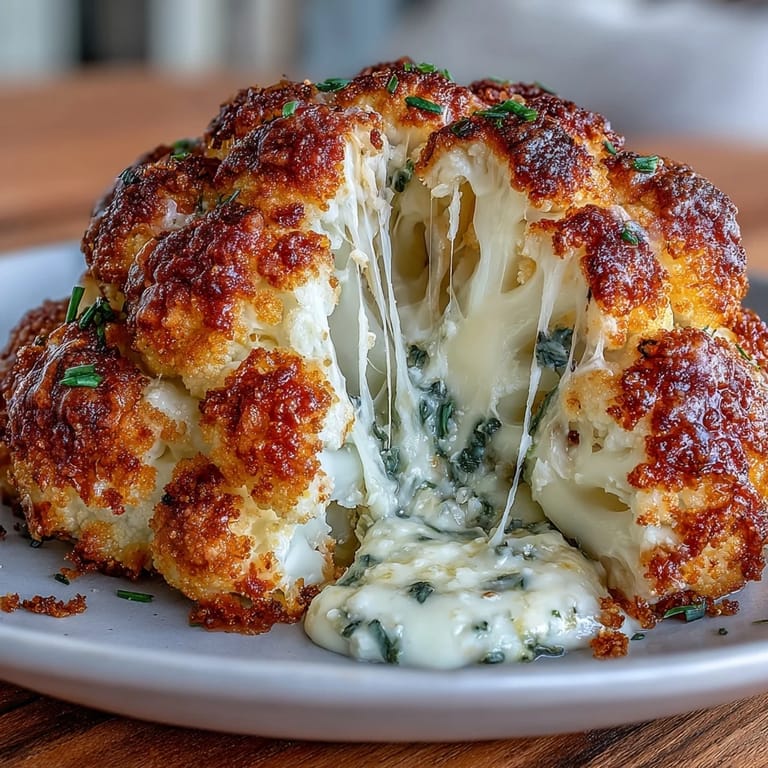
Save My neighbor brought one of these to a dinner party last spring, and I watched everyone's face light up when she sliced into it at the table—golden, steaming, and absolutely worth the quiet oohs and aahs. I'd never thought of a cauliflower head as something you could stuff and showcase like that, but watching the creamy cheese filling spill out changed how I see this humble vegetable entirely. The next week, I was determined to recreate it, and honestly, nailing that balance between tender and just-firm-enough became one of those small kitchen victories I still think about. Now it's my go-to when I want to impress without spending hours in the kitchen.
I made this for my sister's casual Sunday lunch, and she brought her new partner who turned out to be vegetarian—something we'd only found out the morning of. Instead of scrambling, I had this ready in under two hours, and it became the star of the meal, not a compromise. That moment taught me that cooking something intentional and beautiful for people, regardless of dietary needs, is what actually matters.
Ingredients
- 1 large whole cauliflower (about 1 kg): Look for one that's compact and pale, with no brown spots—this is your canvas, and it should feel substantial when you pick it up.
- Olive oil: Just enough to coat the outside; it helps that golden roasting happen and keeps things moist.
- Salt and black pepper: Don't skip seasoning the cauliflower itself, or everything will taste flat.
- 150 g cream cheese, softened: This is your binding agent, the thing that makes the filling creamy instead of crumbly—leave it on the counter for 30 minutes before mixing.
- 100 g shredded mozzarella cheese: The stretchy, melty part of the equation.
- 50 g grated Parmesan cheese: This adds that umami punch that makes people ask what the secret ingredient is.
- 2 tbsp chopped fresh chives: Fresh is important here; they wilt into the filling and add brightness.
- 1 garlic clove, minced: Raw garlic might seem strong, but it mellows beautifully during roasting.
- Smoked paprika and ground nutmeg: These two spices together create a warmth that shouldn't work but absolutely does.
- 1 tbsp milk: Loosens the filling just enough that it spreads into the florets without being runny.
- 50 g shredded cheddar cheese: The topping that gets gloriously golden and crispy.
- 2 tbsp breadcrumbs and 1 tbsp melted butter: This mixture creates that satisfying textured crust on top.
Tired of Takeout? 🥡
Get 10 meals you can make faster than delivery arrives. Seriously.
One email. No spam. Unsubscribe anytime.
Instructions
- Preheat and prepare your workspace:
- Set your oven to 200°C (400°F) and line a baking tray with parchment paper—this prevents sticking and makes cleanup so much easier than you'd expect.
- Trim the cauliflower:
- Remove the outer leaves and carefully trim the base until it sits flat and stable, but keep those florets intact and connected. You're essentially creating a flat base while preserving the whole structure.
- Blanch the cauliflower:
- Bring a large pot of salted water to a rolling boil, then submerge the whole head and let it cook for 8–10 minutes until it's just tender—a knife should slide through the base easily but the florets should still hold their shape. Drain thoroughly and set it aside to cool slightly; this step softens it enough to accept the filling without falling apart.
- Make the cheese filling:
- In a mixing bowl, combine the softened cream cheese, mozzarella, Parmesan, chives, minced garlic, smoked paprika, nutmeg, and milk. Stir until smooth and creamy, tasting as you go—you want it seasoned well because it's the heart of the whole dish.
- Score and stuff:
- Place the cooled cauliflower on your prepared tray and using a small sharp knife, carefully cut deep into the base and between the florets to create pockets where the filling can nestle in. Work gently to avoid breaking the cauliflower apart, then use a spoon or your fingers to press the cheese mixture into every crevice, working from top to bottom—don't be shy here.
- Season the outside:
- Brush the entire cauliflower with olive oil, then sprinkle salt and pepper over all the exposed surfaces so every bite has seasoning built in.
- Create the topping:
- In a small bowl, mix the shredded cheddar cheese with breadcrumbs and melted butter until it looks like coarse crumbs, then sprinkle this mixture evenly over the top and sides of the cauliflower.
- Roast until golden:
- Bake for 40–45 minutes until the top is golden brown and bubbling, and a knife pierced into the thickest part slides through with no resistance—the kitchen will smell absolutely incredible during this time. Let it rest for 5 minutes before slicing into wedges and serving.
 Save
Save There's something quietly powerful about bringing a whole roasted cauliflower to the table—it forces you to slow down, to slice it thoughtfully, to share something that took intention to make. My family stopped eating in the usual rushed way and actually talked about the food, which almost never happens.
Building Flavor Layers
The real sophistication in this dish comes from how the flavors stack and evolve as it roasts. The smoked paprika and nutmeg might seem unusual together, but they create this almost autumnal warmth that balances the richness of the cheese, while the Parmesan adds a salty depth that keeps everything from feeling heavy. The chives add a whisper of something fresh that cuts through the creaminess just right.
Texture, the Unsung Hero
What makes people come back for seconds isn't just the flavor—it's the contrast of that crispy, golden cheddar-breadcrumb top against the tender, cheese-filled florets inside. Roasting brings out a natural sweetness in the cauliflower that plays beautifully against the savory filling, and the texture journey from crunchy to creamy in every bite keeps things interesting.
Making It Your Own
Once you master the basic technique, this recipe becomes a launching point for creativity. I've added sun-dried tomatoes for a tangy depth, sautéed mushrooms for earthiness, and even crispy bacon when I'm not concerned with keeping it vegetarian. The filling is forgiving enough to adapt, but don't go overboard—you want it to still spread easily into those florets.
- Fresh herbs like dill or tarragon swap in beautifully for the chives if that's what you have on hand.
- A squeeze of lemon zest in the filling adds brightness that some people swear by.
- Serve alongside a sharp green salad or roasted root vegetables to balance the richness.
 Save
Save This is the kind of dish that reminds you why cooking for people matters, and why a vegetable can be just as show-stopping as anything else you put on the table. Make it once, and it becomes part of your repertoire forever.
Questions & Answers
- → How do I know when the cauliflower is done?
The cauliflower is ready when it's golden brown on top, the cheese is bubbling, and a knife inserts easily into the center. This usually takes 40–45 minutes at 200°C.
- → Can I make this ahead of time?
You can par-boil the cauliflower and prepare the cheese filling up to a day in advance. Assemble and bake when ready to serve for the best texture and flavor.
- → What other cheeses work well?
Gruyère, fontina, or aged cheddar make excellent substitutions. For a lighter version, use part-skim mozzarella and reduce the cream cheese slightly.
- → Is this suitable for freezing?
Freezing isn't recommended as the texture becomes watery. However, leftovers refrigerate well for 2–3 days and reheat nicely in a 180°C oven.
- → Can I add vegetables to the filling?
Yes, sautéed mushrooms, sun-dried tomatoes, or spinach work beautifully. Just cook excess moisture out before mixing with the cheese to prevent sogginess.