 Save
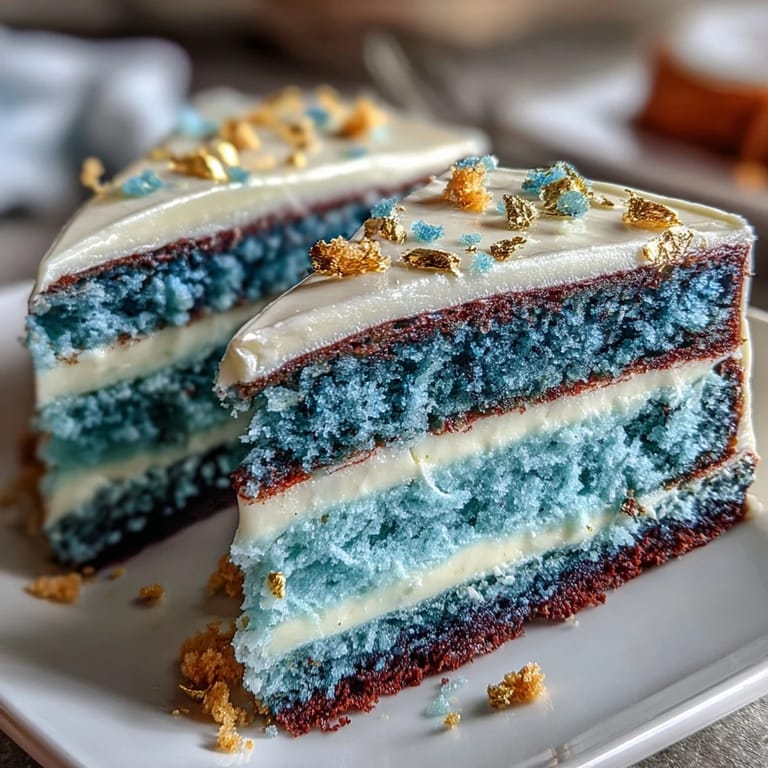
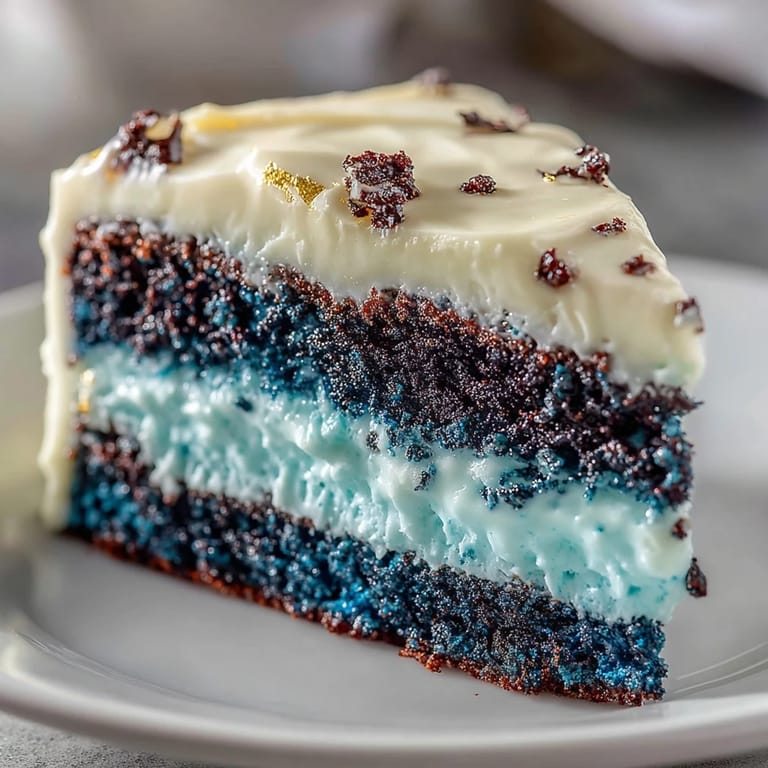
Save The first time a friend asked me to bake a graduation cake for her son, the request was simple: just make it bold. That kitchen was filled with the swirl of vanilla and butter, but what I remember most was the satisfying click of my gel food coloring caps as I plotted the perfect ombre. There’s something almost magical about watching pale batter transform into layers of midnight, royal, and soft sky blues. As my spatula swept on that last velvety buttercream, my little one wandered in, drawn by the shimmer of gold. Who knew a sprinkle of edible gold leaf could spark so much celebration right on our countertop?
Making this cake for my nephew’s graduation felt like a rite of passage—for both of us. As I layered those bold blues while everyone debated college plans at the table, we all ended up sneaking tastes of buttercream and laughing over which blue was bluer. The kitchen became a hub for anxious energy and sweet anticipation, with the cake as the edible centerpiece. The moment the gold leaf went on, my nephew’s eyes widened, and he snapped a photo before I even had a chance. That photo is now tucked into his freshman dorm room, a happy reminder of home.
Ingredients
- All-purpose flour: Crucial for stable, tender crumb—sift for the fluffiest layers and don’t pack the cup.
- Baking powder & baking soda: The dynamic duo that delivers lift; remember to whisk thoroughly with flour for even rise.
- Salt: Don’t skip it; just a pinch deepens all the flavors, especially against sweet buttercream.
- Unsalted butter: Room temperature is key for aerating the batter—be patient, and your cake will thank you.
- Granulated sugar: Its fine crystals cream beautifully with butter, locking in moisture and sweetness.
- Eggs: Add one at a time for a plush, golden crumb and reliable structure.
- Pure vanilla extract: Real vanilla brings aromatic depth and warmth; trust me, it’s worth it here.
- Whole milk: Provides tenderness—let it come to room temp so the batter stays smooth, not curdled.
- Blue gel food coloring: Gel gives bold color without thinning out the batter; use a toothpick for control.
- Powdered sugar (for buttercream): Sift out lumps for cloud-like texture and effortless spreading.
- Milk or cream (for buttercream): Adjusts consistency; start slow, then add drops for the silkiest sweep.
- Edible gold leaf or gold dust: Brings drama—use tweezers for leaf or blend dust with a little clear alcohol for easy painting.
Tired of Takeout? 🥡
Get 10 meals you can make faster than delivery arrives. Seriously.
One email. No spam. Unsubscribe anytime.
Instructions
- Prep Your Pans:
- Grease and line three 8-inch round pans with parchment so those layers release like a dream.
- Mix the Dry:
- Whisk together flour, baking powder, baking soda, and salt—the scent is subtle, but this step is a silent hero.
- Whip Up the Butter and Sugar:
- Beat butter and sugar until it whispers 'fluffy'—don’t rush, this is what makes your cake light.
- Eggs & Vanilla In:
- Crack eggs in one by one and pour in vanilla; each addition brings more richness and color.
- Combine Wet & Dry:
- Alternate flour and milk, beginning and ending with flour, mixing just until smooth; resist over-beating.
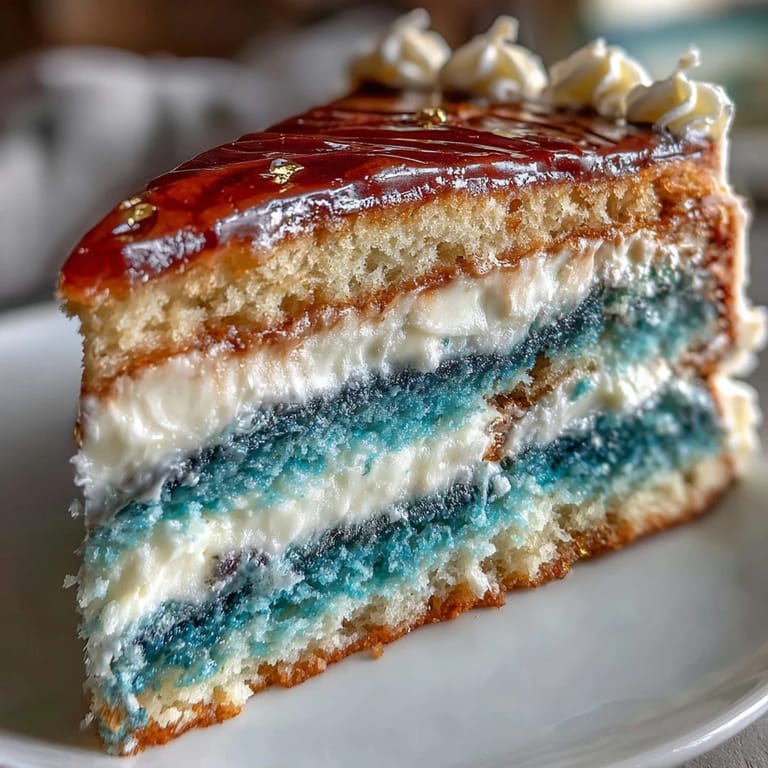
- Create the Ombre:
- Separate batter evenly and tint each bowl with different shades of blue—this is the fun (and sometimes messy) part.
- Bake:
- Smooth the batter in each pan and bake for 25–30 minutes until a toothpick comes out clean; let the smell fill your kitchen.
- Cool Completely:
- Rest the cakes in pans briefly, then cool on wire racks; patience is key or frosting will melt.
- Buttercream Time:
- Whip butter until fluffy, then beat in powdered sugar, vanilla, salt, and a drizzle of milk until spreadable.
- Color the Frosting:
- Set aside plain frosting for the crumb coat; tint the rest deep blue for a striking finish.
- Layer Up:
- Trim cake tops if needed, then stack from darkest to lightest blue with frosting between.
- Crumb Coat & Chill:
- Spread a thin coat with plain buttercream, then chill until firm—this locks in those crumbs.
- Final Frost:
- Smooth on the blue buttercream, blending lighter shades toward the top for ombre magic.
- Gilded Details:
- Apply gold leaf delicately, or paint on gold dust mixed with alcohol for modern flair—less is more here.
- Chill & Serve:
- Chill until party time to keep everything set, then slice into show-stopping layers.
 Save
Save The first time my cousin cut into this cake, every conversation at the table paused while the marbled blue layers were revealed. Suddenly, the cake became more than dessert—it was a moment of awe, laughter, and another round of cheers echoing way past graduation night.
Making Your Ombre Layers Pop
I’ve found that using toothpicks to add color keeps the shades subtle and layered, and starting with the lightest blue lets you adjust the others darker by degrees. Sometimes I mix a little of the darker blue batter into the middle bowl for even better gradient—no measuring, just intuition. I always use gel coloring; liquid just doesn’t cut it for vibrancy.
Gold Leaf and Dust: Tips and Shortcuts
Edible gold can be tricky in a breezy kitchen, so turn off the fan or AC before decorating. I use tweezers for gold leaf (and hold my breath as I place it!)—for gold dust, a clean makeup brush works perfectly. A tiny amount of vodka or lemon extract turns the dust into a paintable accent that dries in seconds.
Decorating and Serving for a Crowd
Sometimes, I add grad caps or chocolate stars alongside the gold to drive home the celebration. A rotating cake stand makes smoothing the frosting almost meditative—no need for perfection, the ombre distracts from every imperfection. And one slice goes a long way, so don’t worry about tiny portions.
- Slice with a hot, dry knife for super clean reveals.
- Serve on a contrasting cake stand to make those colors pop.
- Leftovers freeze beautifully for an unexpected treat on a tough college day.
 Save
Save Here’s to every golden milestone ahead—this cake makes memories, not just plates of crumbs. I hope you get to watch those ombre layers disappear, slice by joyful slice.
Questions & Answers
- → How do I achieve the ombre effect with cake layers?
Divide your batter evenly and tint each portion to varying shades of blue before baking each layer separately.
- → What type of food coloring works best for vibrant blue shades?
Gel food coloring provides intense color without altering batter consistency or introducing excess liquid.
- → How can I apply gold decorations safely?
Use only edible gold leaf or edible gold dust. Brush dust on with clear alcohol or decorate with leaf using clean tweezers.
- → Can I prepare the layers ahead of time?
Yes, bake the layers in advance and store wrapped tightly at room temperature for up to a day before assembling.
- → How do I get a smooth buttercream finish?
Apply a crumb coat first, chill, then use an offset spatula or cake scraper for a flawless final buttercream layer.
- → Are there alternatives to gold decoration?
Yes, try graduation-themed toppers, chocolate stars, or fresh berries for a celebratory look without metallic accents.