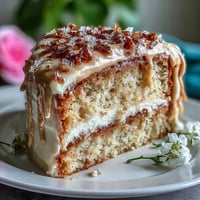
 Save
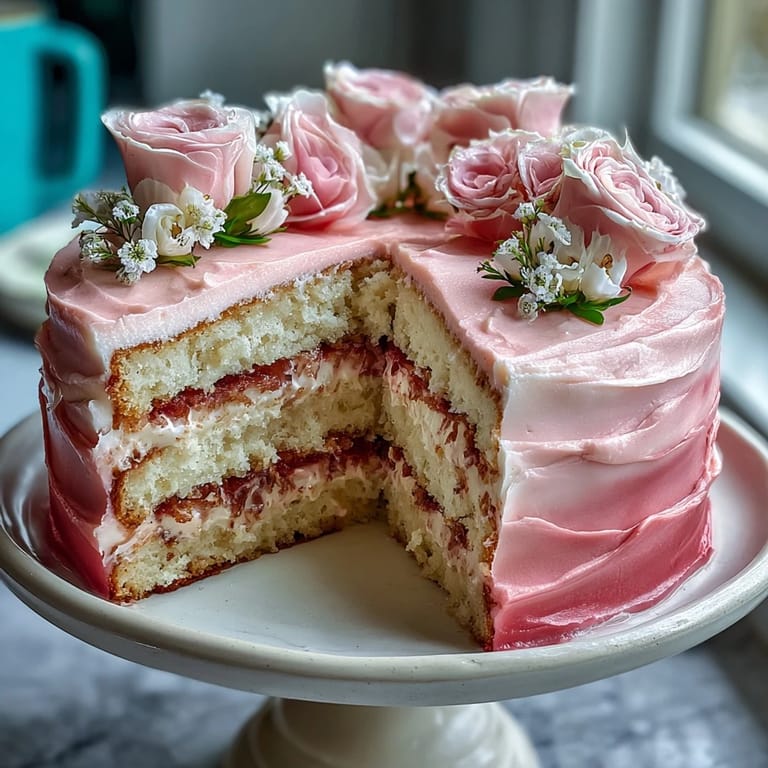
Save My sister called me three weeks before Mother's Day in a mild panic—she'd promised to bring dessert to our family brunch but had zero ideas. I remember sitting in my kitchen, scrolling through photos of elaborate cakes, when I landed on this one: pale pink layers with an ombre effect that looked almost too elegant to be homemade. Something about the simplicity of vanilla sponge paired with that dreamy buttercream gradient felt right, like it whispered elegance without demanding a culinary degree. I decided to test it that weekend, and by the time the cake emerged from the oven, I knew this would become our Mother's Day tradition.
That Mother's Day morning, I assembled the cake at dawn while the house was still quiet, and watching my mom's face light up when she saw it sitting on the dining room table made every careful minute of layering and frosting feel worthwhile. She kept saying it was too pretty to cut into, but once that first slice hit the plate, the tender crumb and buttery frosting won everyone over. My niece asked if I'd made it at a bakery, and my mom just smiled and squeezed my hand—no words needed.
Ingredients
- All-purpose flour: Use fresh flour stored in a cool, dry place; old flour can affect rise and texture noticeably.
- Baking powder: This is what gives the cake its gentle, even crumb; don't skip the full amount or layers may sink in the center.
- Salt: Even a small pinch balances sweetness and brightens the vanilla flavor in ways you'll taste but never identify.
- Unsalted butter, room temperature: Cold butter won't cream properly; leave it on the counter for at least an hour before starting, or cut into cubes for faster softening.
- Granulated sugar: Creaming butter and sugar together for the full 3–4 minutes incorporates tiny air bubbles that make the cake light and tender.
- Eggs, room temperature: Cold eggs don't blend smoothly into the batter and can cause the mixture to separate or look curdled.
- Pure vanilla extract: Genuine vanilla transforms the entire cake; imitation extract tastes noticeably thin and flat by comparison.
- Whole milk, room temperature: The alternating wet and dry technique prevents overdeveloping gluten and keeps the crumb delicate.
- Powdered sugar, sifted: Lumpy powdered sugar creates a grainy buttercream; sifting takes two minutes and changes everything.
- Milk or heavy cream: Cream makes a richer, more stable buttercream; milk works but may require slightly longer beating.
- Gel food coloring: Gel colors are concentrated, so you need less and won't thin the buttercream like liquid colors do.
- Edible flowers: Violets, pansies, and rose petals add delicate beauty; check your source is pesticide-free and meant for eating.
Tired of Takeout? 🥡
Get 10 meals you can make faster than delivery arrives. Seriously.
One email. No spam. Unsubscribe anytime.
Instructions
- Prepare your pans and preheat the oven:
- Set the oven to 350°F and line three 8-inch round pans with parchment paper; this prevents sticking and ensures even, clean cake layers. A preheat thermometer helps verify your oven has actually reached temperature, which matters more than most people think.
- Combine dry ingredients:
- Whisk flour, baking powder, and salt together in a medium bowl until evenly distributed. This step aerates the flour and distributes leavening evenly, preventing dense pockets in the final cake.
- Cream butter and sugar:
- Beat room-temperature butter with sugar for 3–4 minutes until the mixture looks pale, fluffy, and almost mousse-like. You'll hear the mixer change pitch as air incorporates; this is the sound of a tender cake in the making.
- Add eggs one at a time:
- After each egg, beat for about 30 seconds until fully combined before adding the next one. If the mixture looks curdled or separated, don't panic; it will come together once you add the dry ingredients.
- Alternate dry and wet ingredients:
- Add flour mixture in three additions, alternating with milk and always beginning and ending with flour. Mix on low speed just until you don't see streaks of flour; overmixing develops gluten and makes the cake tough.
- Divide and bake:
- Pour batter evenly into the prepared pans and bake for 25–30 minutes until a toothpick inserted in the center comes out clean or with just a few moist crumbs. The cakes will smell absolutely irresistible in the final minutes.
- Cool properly:
- Let cakes rest in their pans for 10 minutes before turning them out onto wire racks to cool completely. This brief rest allows the crumb structure to set; rushing this step can result in broken layers.
- Make the buttercream base:
- Beat room-temperature butter on high speed for 2–3 minutes until it's creamy and pale, then gradually add sifted powdered sugar while mixing on low. Add vanilla and milk, then beat on high for 3 minutes until it's fluffy and light.
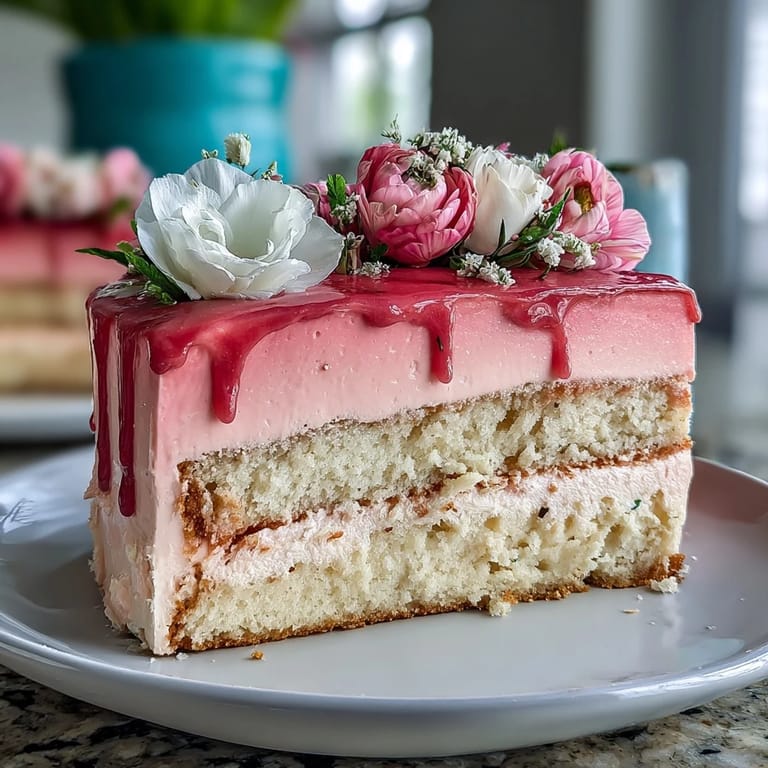
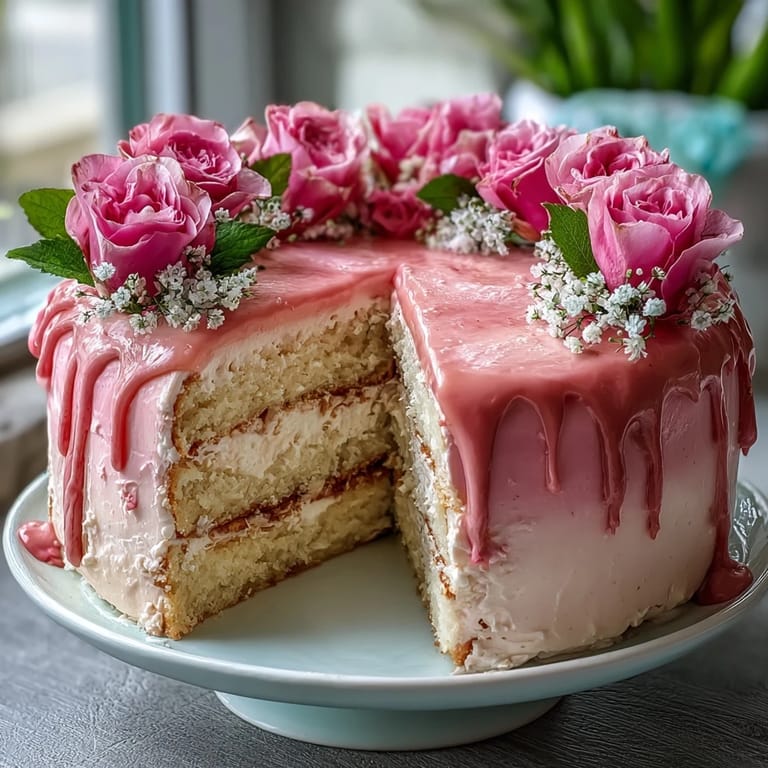
- Create the ombre effect:
- Divide buttercream into four bowls and tint three of them with increasing amounts of gel food coloring, leaving one white. Start with just a tiny dab of color and add more gradually; gel food coloring is potent and a little goes a long way.
- Layer and frost:
- Place the first cake layer on your serving plate, spread the darkest pink buttercream on top, then stack the second layer and apply medium pink buttercream. Add the final layer and frost the top with light pink, then cover the sides with white buttercream for contrast.
- Blend the ombre:
- Use an offset spatula to smooth the frosting, and if you want the ombre effect to blend gradually up the sides, gently blend the colors with a bench scraper. This step is optional but creates a more polished, gradient effect.
- Decorate and chill:
- Arrange edible flowers on top just before serving for maximum freshness, then refrigerate the cake for 30 minutes before slicing. Cold cake cuts cleanly and the buttercream firms up enough to hold its shape.
 Save
Save A few weeks after that Mother's Day brunch, my sister texted me a photo of her own attempt at this cake, made for her friend's birthday. The ombre wasn't perfect, some flowers had slipped slightly, but that cake looked full of love and tasted absolutely delicious—and that's exactly what this recipe is designed for: moments that matter, made beautiful by your own hands.
The Magic of Room Temperature Ingredients
The difference between creaming cold butter and warm butter is startling once you see it happen. Cold butter resists incorporation and takes forever to become light and fluffy, while room temperature butter creams in minutes and holds more air. This matters because all those tiny air bubbles are what create the cake's tender, almost cloud-like crumb. Eggs work the same way—cold eggs don't blend smoothly into the creamed butter mixture and can cause it to separate. Think of it as a chemistry lesson disguised as baking; everything needs to be at roughly the same temperature to blend seamlessly.
Understanding the Alternating Wet and Dry Technique
There's a reason professional bakers alternate dry and wet ingredients instead of dumping everything together. When you add dry ingredients directly to wet, they can cause the batter to seize up, and you risk overmixing in an attempt to incorporate them smoothly. By alternating, you're spreading out the mixing, which means you use less force overall and risk developing less gluten. The result is a cake that stays tender and never becomes tough or dense. I learned this the hard way when I tried to speed up the process by mixing everything at once—the resulting cake was tough enough to use as a doorstop.
Working With Gel Food Coloring and Creating Ombre
Gel food coloring is potent, which means you need surprisingly little to achieve vibrant color without altering your buttercream's texture. Liquid food coloring will thin the frosting if you use enough to get good color, while gel remains thick and spreadable. Start with a toothpick dab for the darkest shade, and work backward from there to create your lighter versions. The ombre effect doesn't need to be flawless to be beautiful; in fact, slightly imperfect blending often looks more organic and charming.
- Always blend each batch of tinted buttercream fully before layering to avoid streaks of unmixed color.
- If you make a shade you don't like, simply remix all the buttercream and start over—there's no waste here, just practice.
- The color will deepen slightly as it sits, so go lighter than you think you want on the first try.
 Save
Save This cake works for more than just Mother's Day—it's become my go-to for celebrations where you want something that looks special but tastes like home. Every time someone asks how I made it look so polished, I smile and realize it's not magic or secret techniques; it's just patience, a little pink food coloring, and the joy of making something beautiful for people you love.
Questions & Answers
- → How is the pink ombre effect achieved?
The buttercream is divided into portions and tinted with increasing amounts of pink gel food coloring to create a smooth gradient from white to deep pink.
- → What is the best way to keep the cake moist?
Brushing the cooled cake layers with simple syrup before applying the buttercream helps retain moisture and adds extra flavor.
- → Can edible flowers be eaten safely?
Yes, but use only edible varieties like violets or rose petals and ensure they’re pesticide-free. Remove any non-edible toppers before serving.
- → How long should the cake chill before serving?
Chill the decorated cake for about 30 minutes to set the buttercream, which allows for cleaner slicing and better presentation.
- → What tools help create the smooth ombre sides?
An offset spatula and optionally a bench scraper can be used to blend buttercream layers smoothly up the cake sides, enhancing the ombre effect.