 Save
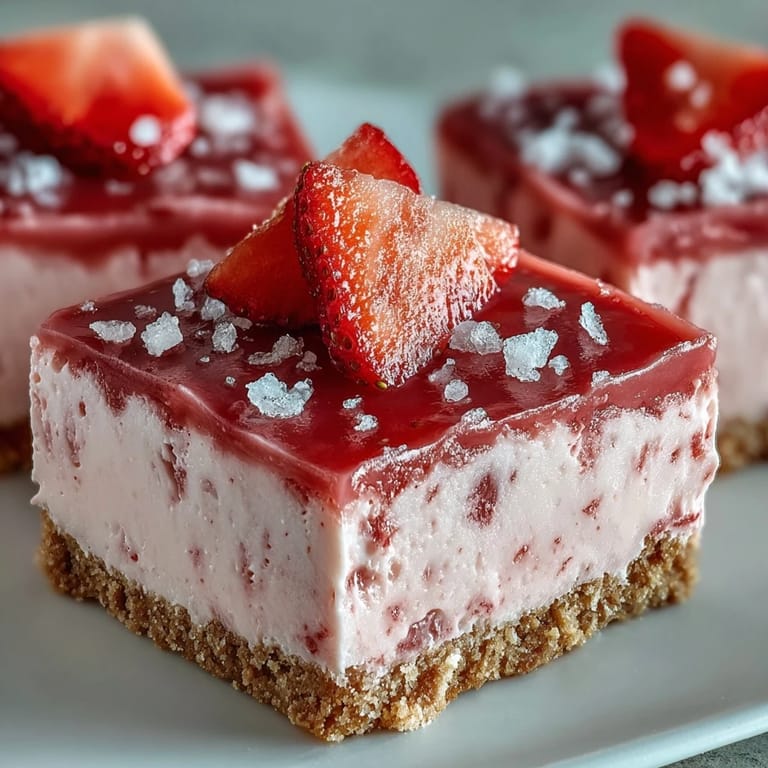
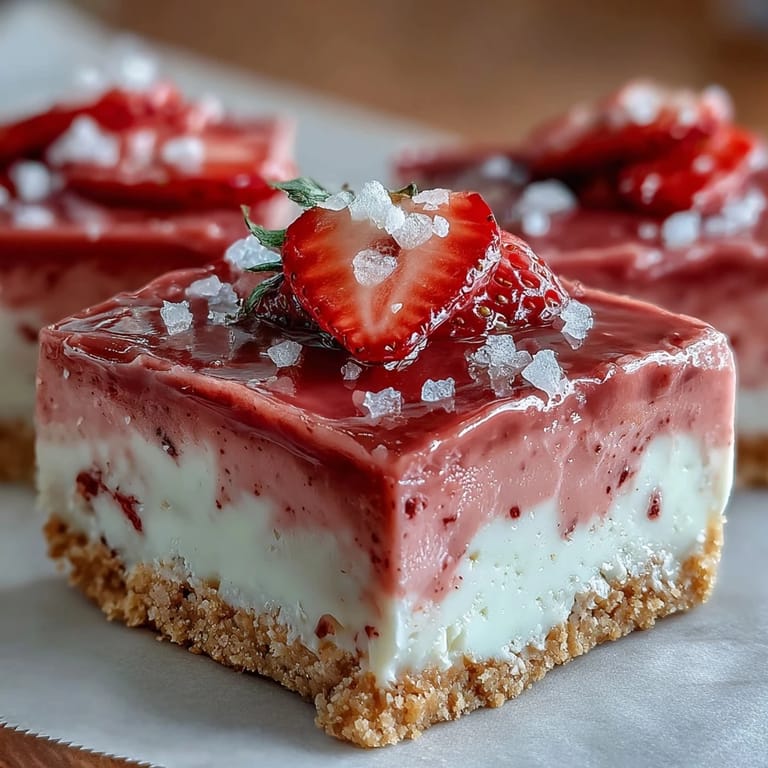
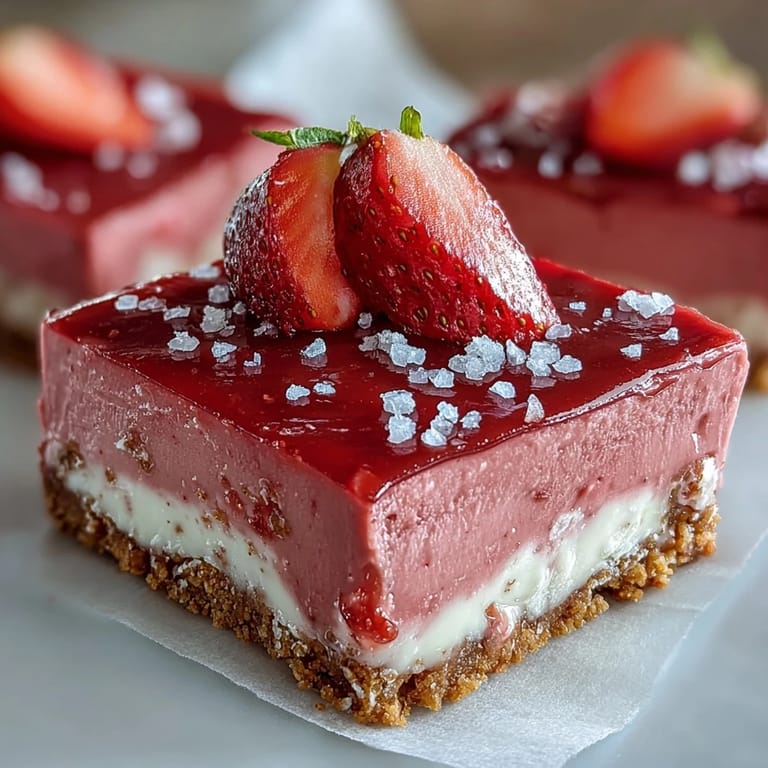
Save My neighbor showed up one afternoon with a pan of bright pink squares that looked almost too pretty to eat. She called them her "emergency dessert" because they required no oven, no mixer, and came together while her toddler napped. I tasted one standing in her kitchen, and the creamy white chocolate hit first, then the strawberry tang, then that satisfying crunch from the base. I went home and made them that same week.
I brought a batch to a potluck where everything else was chocolate or caramel, and these vanished first. People kept asking if I used real strawberries or some kind of fancy European ingredient. The truth is simpler than that. Freeze dried strawberries from the snack aisle, melted white chocolate, and a little patience in the fridge is all it takes. The pink color makes people smile before they even take a bite.
Ingredients
- Digestive biscuits or graham crackers: The base needs to be sturdy enough to hold the fudge layer, and these biscuits crush into fine, buttery crumbs that press together beautifully without feeling sandy.
- Unsalted butter: Melted butter binds the crumbs and adds richness, but using unsalted lets you control the salt level in the finished squares.
- White chocolate chips: This is the body of the fudge layer, so choose good quality chips that melt smoothly without seizing or going grainy.
- Sweetened condensed milk: The magic ingredient that turns melted chocolate into fudge, adding creaminess and just enough sweetness to balance the tart strawberry.
- Freeze dried strawberries: Ground to a powder, these deliver concentrated berry flavor and natural color without adding liquid that would soften the fudge too much.
- Pure vanilla extract: A small splash rounds out the sweetness and makes the strawberry taste more like fresh fruit than candy.
- Pinch of salt: This keeps the fudge from tasting one dimensional and brings out the strawberry flavor in a way sugar alone cannot.
- Pink or red gel food coloring: Completely optional, but a drop or two makes the squares look like something from a patisserie window.
Tired of Takeout? 🥡
Get 10 meals you can make faster than delivery arrives. Seriously.
One email. No spam. Unsubscribe anytime.
Instructions
- Prep the pan:
- Line your square pan with parchment paper so the overhang creates little handles on two sides. This makes lifting the whole slab out later almost effortless.
- Make the crust:
- Stir crushed biscuits and melted butter together until every crumb is coated and the mixture clumps when you squeeze it. Press it firmly into the pan with the back of a spoon or the bottom of a glass, then chill for 10 minutes so it sets up and does not mix into the fudge layer.
- Melt the fudge base:
- Set a heatproof bowl over simmering water and add white chocolate chips and condensed milk. Stir gently and constantly until everything melts into a glossy, smooth mixture.
- Add strawberry flavor:
- Remove the bowl from heat and stir in strawberry powder, vanilla, salt, and food coloring if using. Mix until the color is even and the powder is fully dissolved with no lumps.
- Assemble and chill:
- Pour the pink fudge over the chilled crust and spread it to the edges with a spatula. Cover loosely with plastic wrap and refrigerate for at least 2 to 3 hours until the top feels firm when you press it lightly.
- Slice and serve:
- Lift the whole slab out using the parchment overhang, set it on a cutting board, and slice into 16 squares with a sharp knife. Wipe the blade between cuts for clean edges, and garnish with fresh strawberry slices or extra freeze dried pieces if you like.
 Save
Save The first time I made these for my daughter, she said they tasted like strawberry cheesecake without the work. She was right. That creamy tang, the crunchy base, the way they melt just a little on your tongue, it all feels fancy without any fuss. Now I keep a bag of freeze dried strawberries in the pantry just in case I need to whip up a batch on short notice.
How to Get the Best Texture
The secret to fudge that slices cleanly and does not crumble is in how you press the crust and how long you chill the fudge layer. Use the bottom of a measuring cup or a small glass to really pack the crumbs down evenly, especially in the corners. When the fudge goes in, give it the full 3 hours in the fridge so it firms up all the way through. If you try to slice it too soon, the knife will drag and the edges will look messy instead of sharp.
Flavor Variations Worth Trying
Once you master the base recipe, you can swap the strawberry powder for other freeze dried fruits like raspberries, blueberries, or mango. I have even mixed in a spoonful of lemon zest with the strawberry for a brighter, more citrusy bite. If you want a marbled look, swirl in a few spoonfuls of crushed fresh raspberries right before you spread the fudge over the crust. The color bleeds in soft pink and red streaks that look beautiful when you slice into them.
Storage and Make Ahead Tips
These squares keep beautifully in an airtight container in the fridge for up to 5 days, and they actually taste better on day two when the flavors have had time to meld. You can also freeze them for up to a month. Just layer them between parchment paper so they do not stick together, and let them thaw in the fridge for a few hours before serving.
- Always store them in the fridge because the fudge layer softens quickly at room temperature.
- If you are taking them to a party, transport them in the pan and slice them when you arrive so the edges stay sharp.
- Let them sit out for 10 minutes before serving if you want a softer, creamier texture instead of firm and cold.
 Save
Save There is something satisfying about pulling a pan of these out of the fridge and seeing that bright pink layer sitting perfectly on the golden crust. They taste like a celebration, but they come together with the kind of ease that makes you want to make them again and again.
Questions & Answers
- → Can I use fresh strawberries instead of freeze-dried?
Fresh strawberries work but add extra moisture. Use 100g puréed and strained fresh berries, though the fudge may be slightly softer and require longer chilling time.
- → How long do these squares last in the refrigerator?
Store in an airtight container for up to 5 days. The texture remains perfectly fudgy and the graham crust stays crisp when properly sealed.
- → Can I make these dairy-free?
Yes. Substitute dairy-free white chocolate and coconut condensed milk. Use vegan butter or coconut oil for the crust. The texture remains equally creamy.
- → Why is my fudge layer not setting firmly?
Ensure the white chocolate and condensed milk are fully melted and smooth before combining. Refrigerate for at least 3 hours—overnight is even better for firmest results.
- → Can I freeze these fudge squares?
Freeze for up to 2 months in a freezer-safe container. Thaw in the refrigerator for 2 hours before serving. The crust may soften slightly but flavor remains excellent.
- → What's the best way to get clean cuts?
Use a sharp knife warmed under hot water, wiping the blade clean between each cut. Let squares sit at room temperature 10 minutes before slicing for smoother edges.